|
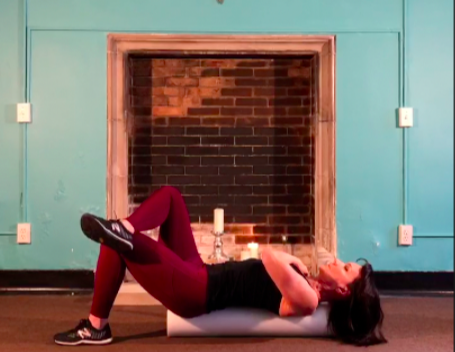
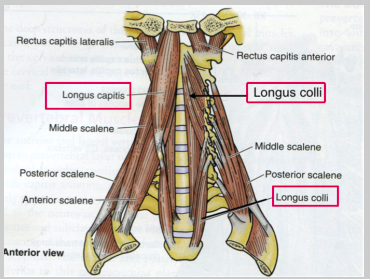
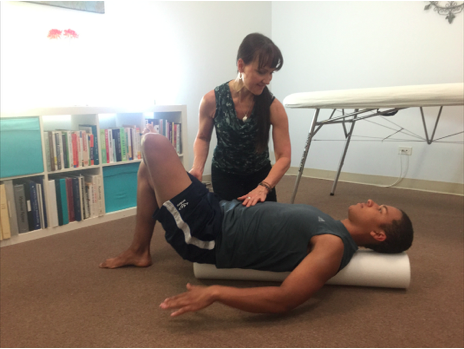
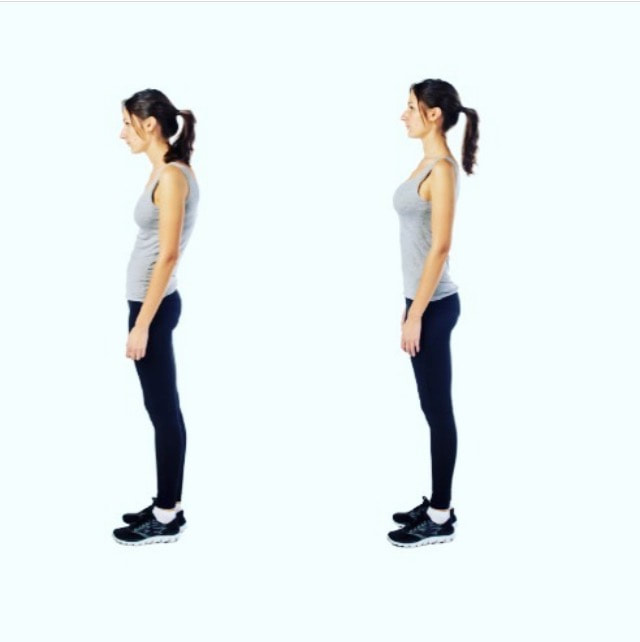
NOTE: The exercises in this article are demonstrated for informational purposes only, and should not be construed as a prescription for any one individual. No diagnosis is made. The what Imagine an object made out of thick, new rubber. It gives, but not too much. It is firm and strong, not hard and brittle. That is how you want the joints of your spine, made up of 24 individual bones, or vertebrae, balanced one on top the other, to function. The spinal column is the central axis of the human skeleton, and houses your spinal cord and serves as an attachment for your ribs and numerous muscles. The vertebrae are separated by discs that serve as “spacers” and cushioning, like the suspension system in a car. They are held in place by ligaments, thick fibrous bands, somewhat similar to tendons, and, importantly, muscles. While the ligaments provide boundaries for extreme motion, eg making sure you can’t bend or twist too far, it is muscles, guided by nerves, that provide immediate support and stability, and fine-tune movement. If you think of muscles as either primarily providing support or movement, you can think of the weaker muscles closest to the spine as primarily providing that rubber-like support and precise control of movement and joint position, and the longer, stronger muscles closer to the surface of the body as providing strength and movement. In a real-life situation multiple trunk muscles work together to achieve this stability. The why It is thanks to this invisible work of the spinal and other trunk muscles that we stay upright, don’t fall sideways when we reach out to grab an object, and are able to move our arms and legs without the trunk flailing around as well. As is often the case with diligent and reliable work, trunk stability is usually only noticeable through its absence, which can lead to pain and injury. It is quite common for the deeper muscle layer to become weak, with replacement of the muscle fibers with fat, and for the superficial layer to take over. This finding is commonly associated with low back pain and neck pain, and with the ubiquitous, gradual degeneration of the intervertebral discs. As an example, individuals with chronic back pain often have thinner multifidus muscles, the deepest muscles of the spine, and thick and tight superficial back extensor muscles. Pain can inhibit muscle activity and weaken stabilizing muscles, as can adopting non-neutral postures such as a swayback posture and spending too much time sitting and relaxing these muscles. When our muscles aren’t able to stabilize the trunk, our spine may also sag into a more exaggerated curvature, leading to swayback, humpback or a head that juts out way too far in front of the body. A trunk without proper stabilization isn’t able to stay (relatively) still or stable during movement, and sways this way and that when we run or walk. This impairs athletic performance, reflexively forces muscles into a chronic, achy tightness, and predisposes us to injuries of both the spine --including the neck-- and adjoining joints of the hips and shoulders, and the temporomandibular (TMJ) joints. Individuals on the hypermobility spectrum are especially prone to this type of instability and to suffer from pain and dysfunction as a result. The softer, stretchier ligaments and other soft-tissue structures that hypermobile individuals have, allow joints to move too far, and without the stabilizing influence of a well-coordinated neuromuscular response they are prone to the all the above-mentioned dangers of poor stabilization, but to a much higher degree. The resulting pain can lead to bracing and tightening responses that are poor substitutes for a well-coordinated musculoskeletal system, often leading the individual into a spiral of inactivity, increasing weakness, instability and injury, and more pain. As hypermobile people also tend to have decreased balance and coordination the need for consistent work on stability is even greater in this population. The how Stabilizing the trunk against external forces such as gravity, weights or the wind, or the momentum caused by our own movements, is a high-level skill that is best approached step by step, starting with a simple exercises, and gradually moving towards more and more complex, functional, or real-life, movements. Human movement arises from a complex interrelationship between the various component parts of our nervous system and our musculoskeletal system, and much is yet to be learned and understood. This article is not intended to provide a comprehensive roadmap to spinal health, but rather help the reader start with safe, manageable exercises that can, and should, gradually be progressed and ultimately both be incorporated into everyday postures and movements, and used as a springboard to continue with more complex, functional exercises that involve the extremities both while being still and in motion. Stabilization, or, as they are sometimes referred to, motor control, exercises also create the perfect base for similar exercises for the extremity joints. A safe position to start in is lying on your back on a foam roll (6" x 36”) as pictured at the top of the page. In this position the spine is well aligned, the head is held in line with the spine instead of in front of it, and for hypermobile individuals the position carries the added benefit of not triggering forward subluxation of the hip joints. (For non-hypermobile readers whose hips don’t behave in wacky ways, just disregard that last piece). Instructions for a foam roll trunk stabilization exercsie Lie on your back so that the foam roll supports your body from head to tailbone. If your upper back (thoracic spine) is a bit rounded, your neck will be bending backwards in this position. If this is the case, use a pillow under your head in order to allow your face to be oriented towards the ceiling, as shown in the photo below. With the palms of your hands on the floor, place the ankle of one leg on top of the opposite knee. If the position hurts your shoulders, place a couple of books or other objects on the floor, under your hands, to prevent your arms from moving behind your trunk.  Watch video here or here . Now you are ready to start the exercise. 1) Exhale and gently activate your pelvic floor muscles *), feeling this activation spread to your deepest abdominal muscles (transversus abdominis) as well. Raise your hands hands off the floor and balance. Keep the roll as still as you can. Try not to dig the leg into the floor, but let your trunk do the work (see above). When you can balance like this, on and off, for 5-10 minutes, switching periodically between the right and left leg, progress with step 2, gradually working your way towards step 5. Always start as in step one, with an exhale and gentle activation of your deep stabilizing muscles through your pelvic floor. *)pelvic floor muscle activation, sometimes referred to as “Kegels”: To identify the pelvic floor muscles, stop the flow of urine, take note of what you are doing to make this happen. You are now contracting your pelvic floor muscles! 2) Balance with hands across the chest. 3) Raise your arms in the air, keeping your hands close, as in holding a ball, and make slow circles in the air. 4) Hold one arm across the chest, keeping the arm on the side of the elevated leg straight in the air. Make a slow chopping motion to the side. 5) Move both arms, making slow, sweeping motions parallel to the floor, on the side of the elevated leg. Perform the exercise 1-2 times per day until muscles are tired. Be patient! Give the exercise time to take effect, and don’t try to exercise at a level you are not ready for yet, lest you end up bracing and holding your breath. Stability does not equal rigidity. Most individuals will notice that one side feels weaker and harder to control than the other. Focus on strengthening this side, to achieve greater symmetry. Progressing to the final step may take weeks to months, depending on where you start and how often you practice. As you’re working on this as an exercise, also try to incorporate this stabilizing strategy into your every day activities. This supported position, with the slow movements described, gives you a chance to start learning how to control your trunk, and from here you can gradually progress to the upright position, with more dynamic and functional exercises that involve movement and replicate natural activities. Postural habits that maintain spinal/trunk stability Use it or lose it is an admonition that applies not only to cognitive skills, but to musculoskeletal ones as well. In order to maintain the thickness and good function of the precious deep muscle layer of the spine, we have to use it regularly. Spending countless hours in a chair, sofa or car seat all day, every day, allows trunk muscles to rest themselves into oblivion. Our hunter-gatherer ancestors got plenty of rest every day as well, but if modern-day tribespeople are a good proxy, their rest positions included postures that allowed muscles to stay more active. A good rule of thumb for sedentary workers is to briefly stand up every fifteen minutes, and intersperse time reclining in office chairs with standing and sitting upright without a backrest. Becoming habituated to more natural movement patterns that include squatting, bending from the hips, or "hip-hinging", when picking things up instead of allowing the trunk to relax and passively fall forward, all engage stabilizing muscles and prevent atrophy and unstable movement patterns. African woman bending from the hips while keeping her spine straight and stable.  Neck stability The muscles of the neck have a similar organization. There is a deeper layer of muscle, located very close to the vertebrae, called (somewhat unimaginatively), the Deep Neck Flexors, or DNF for short. They provide stability of the seven cervical (neck) vertebrae, and decreased activation of this layer, with increased activation of the more superficial muscles (visible under the skin) is correlated with unnatural postures and movement patterns, and with chronic neck pain. Deep Neck Flexors: Longus captis, longus colli You can learn how to identify and activate this deep stabilizing system using the exercise below. Lie on your back with your knees bent, head resting comfortably on a pillow or a book. Locate the Sternocleidomastoid muscle (SCM) at its insertion at the inner corner of your collar bone. You can see it clearly in the photograph below, running from just below the ear, to the inner corner of the collarbone. Place your index finger on the muscle insertion right there. Since the DNF are just that, deep, you can't touch them to know that they are working. Because of that, we are going to use an indirect method. If, during the exercise, you can feel the SCM working, you are not using the DNF. Lift your head off the pillow to make sure that you feel the SCM tighten under your fingers. This is the muscle contraction that you are going to try to not feel during this exercise. Relax your head onto the pillow again, and feel the SCM soften. Remember, throughout the exercise, you want the SCM to remain relaxed and soft. Now you will perform the exercise as follows: 1) With your head resting on the floor, pillow or a book, gently nod, trying to not feel the SCM tighten under your fingers. It may help too imagine that you are working with muscles behind your throat, where the deep neck flexor muscles (DNF) are located. The nodding motion should be minimal, barely noticeable to a casual observer, and the head must remain on the pillow, floor or book. Imagine the back of your neck lengthening. Do not work hard. This is a very gentle, barely perceptible exercise. Your are working on control and finesse, not strength and force. Quality over quantity! 2) Once you are able to nod without feeling the SCM contract under your fingers, perform 10 nods with a 10 second hold each time. Fully relax your head onto the pillow or book between nods, so that you can feel the SCM relax. 3) Once you can do the above easily, perform the exercise seated, leaning forward a little each time, making sure that the SCM is still not performing the work/tightening under your finger. When you have been performing this exercise daily for a while and are ready to progress, this website has some suggestions for progression. Postural habits that maintain neck stability The neck will be properly aligned, and the stabilizing muscles will be active, when you are holding yourself in a natural position, that allows the cervical spine (the neck) to effortlessly balance atop the rest of the spine. The two most common postural mistakes, in a seated or standing position, that strain the neck and its structures are either A) Collapsing, as on the left in the photo below. This weakens the DNF and overworks the "coat hanger muscles", the Upper Trapezius. or B) Retracting the neck and head as a reaction to collapsing, or to protracted shoulders. This over-activates muscles in the front of the neck, such as the SCM mentioned above at the expense of the DNF. To achieve the balanced posture shown on the right, below, most individuals need to shift the weight a little bit towards the heels and "untuck" the pelvis, ie tip the pelvis forward, allowing the tailbone to move upwards. A smaller percentage, most commonly hypermobile individuals, have a swayback posture and actually need to tilt the pelvis backwards a bit, as in tucking the tailbone under. Allowing the chest to float upwards, as shown in the photo below, in the image to the right, allows the neck to relax into a neutral position. After correcting your posture--whether sitting or standing--you want to check in with your neck and make sure that it's relaxed, not bracing and holding. Chronic pain and discomfort in the musculoskeletal system is more often a sign of a dysfunction than of an injury Over time such dysfunction, or "using your body incorrectly", getting stuck in unnatural movement patterns, may of course lead to injury and subsequent pain, but a good rule of thumb is to always first correct the how of the body's functioning, before you consider any other options.
I would of course be remiss to not mention that most people would achieve even greater results performing these exercises under the guidance of, and with the individualization provided by, a Doctor of Physical Therapy. That said, the two exercises and the lifestyle changes detailed in this post are gentle and broadly applicable, as they simply represent going back to our "factory settings", or using our bodies the way nature intended. As always, feel free to comment below with any questions you may have! To your health!
6 Comments
|
Archives
February 2024
|


 RSS Feed